


If your school or district is moving towards online learning with Zoom, you may be looking for guidance and tips on how to make the most of the tool. Zoom is a video conferencing platform that allows you to connect virtually with students, families, and other educators on your team—both individually and in groups.
For example, you may be a teacher running virtual classes with your students using Zoom or a district administrator conducting a virtual meeting with your central office team.
No matter your role as an educator, this guide covers the basics of using Zoom. You'll learn how to set up a free Zoom account, stay connected through Zoom, and facilitate remote learning with students and families. We hope this guide is helpful as you work to build relationships with and support your school community online.
1. For Educators: How to Create a Zoom Account
3. How to Facilitate Collaboration with Zoom
4. Frequently Asked Questions about Zoom for Educators
For Educators: How to Create a Zoom Account
Creating your Zoom account is simple. Here are the steps to follow:
- Go to Zoom.us.
- Click on the "Sign Up, It's Free" button at the top right corner.
- Sign up using your school or district email address so that Zoom can verify you.
- Fill out the K-12 School Verification Form, which temporarily lifts the 40-minute time limit for anyone on your school's domain. Note that only one person in your district needs to fill out the form. If you're not sure if this has happened yet, take a look at your "Profile" page on your account, which will say if your meetings are currently limited to 40 minutes.
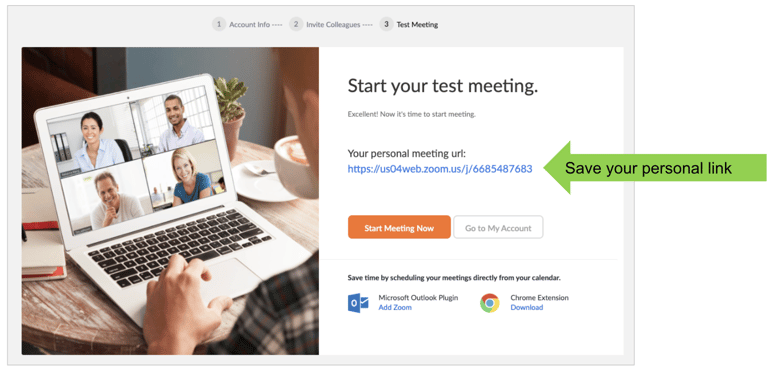
- Save your personal meeting URL so that you can find it easily.
How to Use Zoom to Connect
Changing Your Zoom Settings
Before you get started using Zoom conferencing, we recommend visiting your account settings page to adjust the default settings. Here's how to find your settings page through the website version of Zoom:
- Log into your account.
- Click on "Settings" on the left-hand side
- You will see all of your current settings that apply to every meeting you host, schedule, or record.
- Toggle the switch next to any settings you wish to modify.
Recommended Settings:
| Setting | We Recommend... | Why? |
| Host Video | Off | Gives you time to ensure you’re ready for the camera when you turn video on. |
| Audio Type | Telephone and Computer Audio | Gives you options in case internet is unstable. |
| Join before host | On (*with Waiting Room on) | Allows participants to join before the host. The waiting room allows people to join without being admitted into your meeting until you’re ready. |
| Use Personal Meeting ID (PMI) when scheduling a meeting | Off | Eliminates the chances of someone being able to drop in to your meeting by mistake. |
| Chat | On | Allows participants to send messages for all to see. |
| Private Chat | On | Allows participants to send direct messages to you. |
| Screen Sharing | On | Allows you or participants to share screen or content. |
| Annotation | On | Allows participants to use annotation tools to add information to shared screens. |
| Whiteboard | On (and auto-save content) | Allows participants to share whiteboard during a meeting. |
| Attention Tracking | On | Allows you to see if meeting participants are or are not focusing on Zoom. |
| Waiting Room | On | Gives you the ability to admit each person when you’re ready to start the meeting. |
Starting vs. Scheduling a Meeting
Zoom allows you to "Start a Meeting" instantly or "Schedule a Meeting" in advance. Here are the differences between the two approaches:
- Starting a Meeting (Uses Your Personal Meeting ID): When you click "Start a Meeting," the system will automatically use your Personal Meeting ID, which is the same link every time. Example use cases include: Quick check-ins with colleagues, families, or students. The only downside to using your Personal Meeting ID for meetings is that anyone with your link can join another meeting you are hosting by mistake.
- Scheduling a Meeting (Option to Use Your Personal Meeting ID or a Newly Generated Meeting ID): When you choose to "Schedule a Meeting," you will have the option to use a newly generated link or your Personal Meeting ID. Although using a newly generated link gives you more control over whom can join your meeting, this method does take a little more time to set up a meeting. Example use cases include: Recurring meetings or confidential/sensitive meetings.
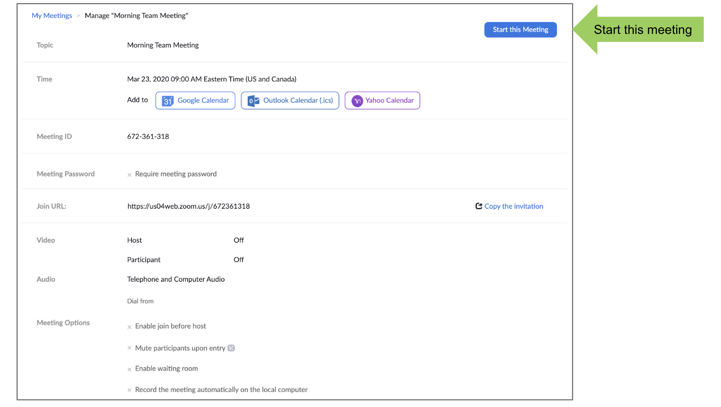
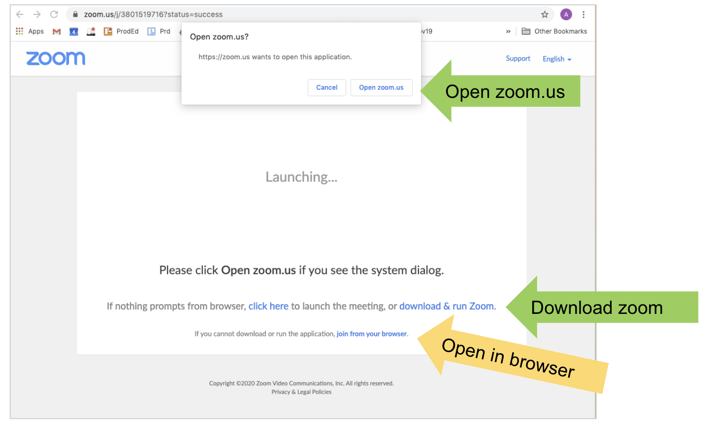
When it's time to start your meeting, click the "Start this Meeting" button, as shown below. Zoom will prompt you to open the application. If you are unable to download or open the application, you can join the meeting from your browser by clicking the link to "join from your browser" at the bottom of the page.
Hosting a Meeting
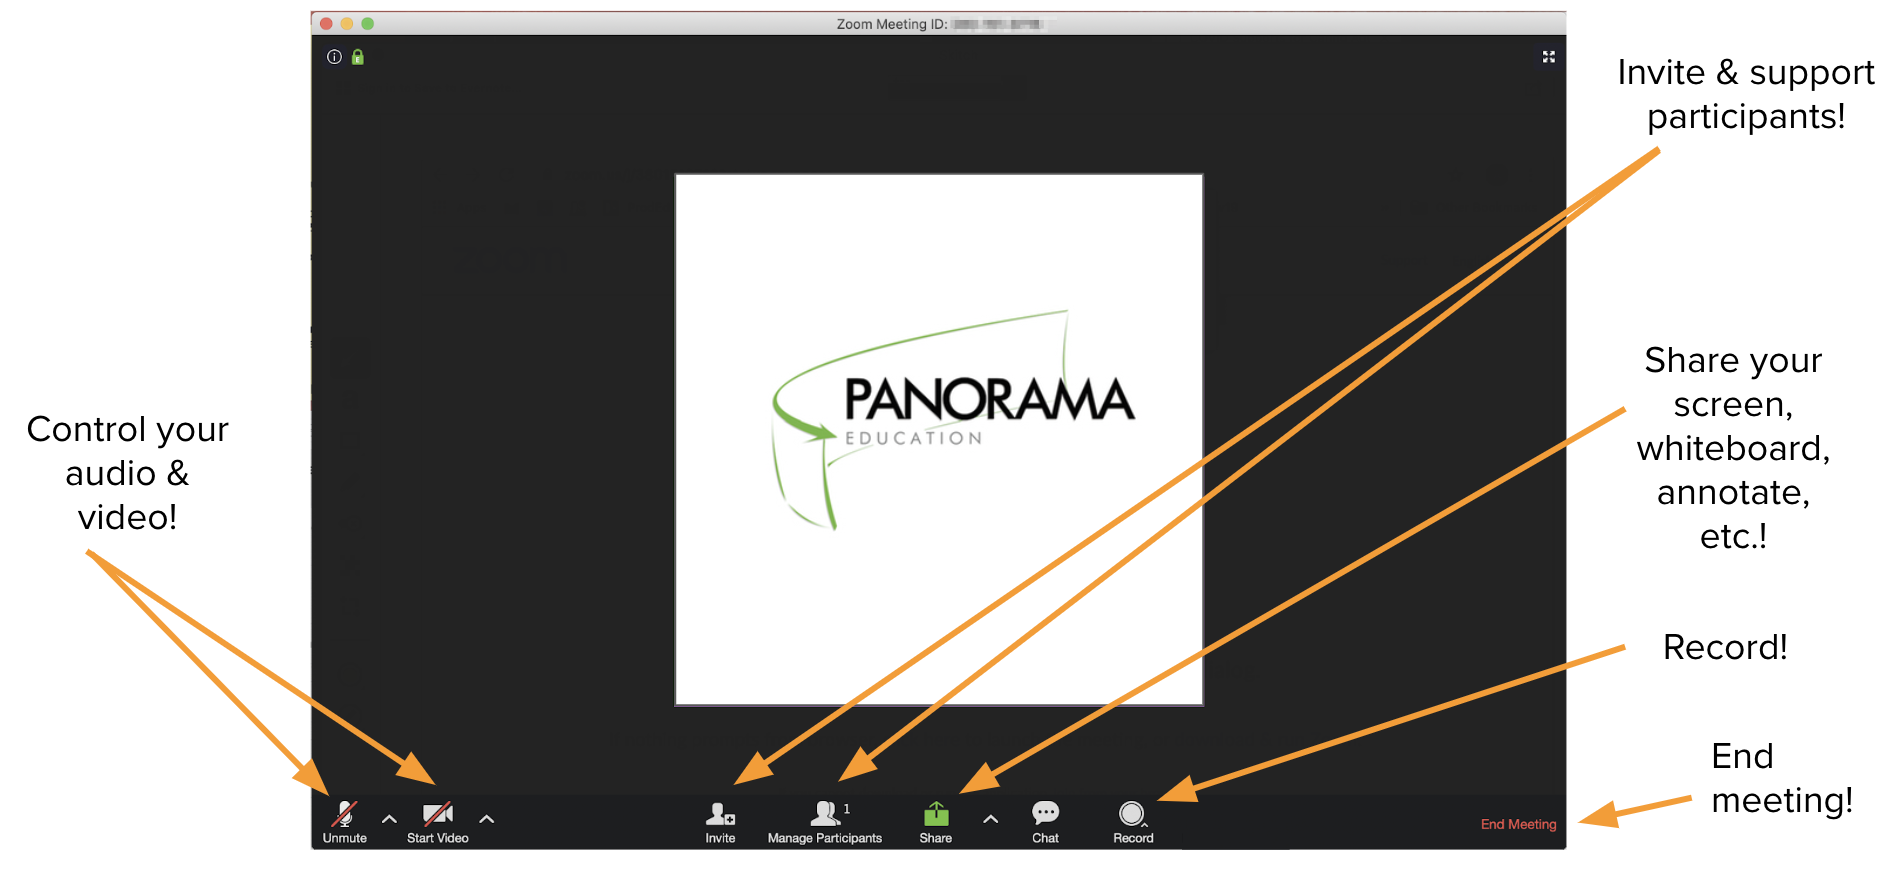
As a meeting host, you'll notice a number of settings on your toolbar:
- Mute/Unmute: Toggle this on and off to control your audio
- Start/Stop Video: Toggle this on and off to control your video
- Invite: Is someone having difficulty joining the meeting? You can re-send them the meeting link using this button.
- Manage Participants: This allows you to unmute/mute people or message people one on one.
- Share: Share your screen, your whiteboard, or access annotation features during the meeting.
- Chat: Access the group chat function.
- Record: Record the meeting.
- End Meeting: As the host, make sure to "End Meeting for all" once the meeting is over.
How to Facilitate Collaboration with Zoom
Recording a Meeting
If you choose to record a meeting, you may be wondering where the recording goes and how you can share it. Here are two types of recordings:
- Local Recording: This is the default recording method for basic accounts. The recording will download on your hard drive as a .MP4 file. This makes it easy to upload the recording file into Google Drive or another shared drive.
- Cloud Recording: Note that cloud recordings are not available with a basic account, but some educators might have this feature added on by their district. This means that recording will download to your Zoom account, and you will be able to access the file in your "Recordings" account page. This makes the recording link easy to share with others, either via a public link or by making it available to authorized people only. Zoom also has some editing capabilities within its platform for recordings.
Sharing Your Screen
You can use the screen-share feature to share anything you’d like with students or families. This could be a slide deck, a document, a website, a video, or even your entire computer desktop.
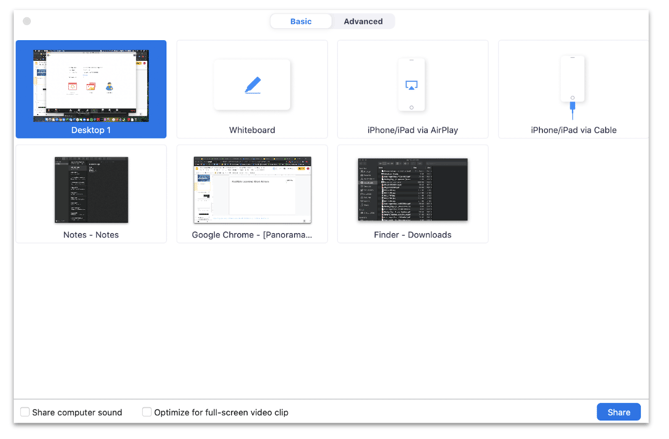
To share your screen, click on the "Share" button on the bottom of the Zoom player. You will have the option to share many screens and windows. If you do not want to share your entire desktop, select the specific application/screen/window (Google Chrome, for example) that you intend to share (rather than "Desktop").
Pro tip: If you plan to share a document for everyone to work on, we suggest first sharing the document itself with participants (via a Google Doc, for example), and then sharing your screen. That way, you can project that document in the meeting, people will be able to type into that document, and the updates will show in real time through the screen-share.
Whiteboard and Annotation Tools
The whiteboard and annotation tools are available in basic accounts. With this tool, you can draw, write text, or brainstorm together. One example is to ask students to "Draw what you ate for breakfast today."
How to use the whiteboard tool:
- In your settings, make sure that Whiteboard and Annotation is turned "on."
- Click "Share" during the meeting.
- Click "Whiteboard."
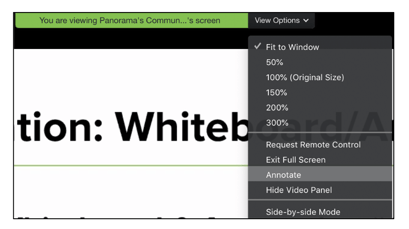
For participants to use the whiteboard, you will need to invite participants to "Annotate." Then, participants will click "View Options" and "Annotate."
Learn more about whiteboard and annotation tools here.

Frequently Asked Questions about Zoom for Educators
Is Zoom free for anyone? What if I’m not directly affiliated with a school or district?
Yes. Anyone can create a basic Zoom account for free. With a basic account unaffiliated with a school or district, you can access most features and meetings are limited to 40 minutes long.
Do participants need to have a Zoom account to join a meeting?
No. Only the host needs an account. As a host, you can share a meeting link with anyone via email, text, etc.
What is the maximum number of people you recommend for a Zoom meeting?
On a Zoom call, you cannot host more than 100 people. We recommend keeping meetings at or fewer than 20 people. If you have meetings larger than that, you can leverage the breakout groups function.
Zoom has eliminated the 40-minute meeting limit for K12 educators, and there is a verification form to fill out. Who is included in the verification, and how do I know if I am verified?
From Zoom’s website: “If your school has already been pre-approved and your Zoom Basic account is linked to your school email address, you’ll get a notification the next time you log into Zoom. If you did not receive a notification, you can request to have the time limit lifted for your school here.”
I know another teacher in my school has signed up for Zoom. Do I still need to fill in the verification form?
The verification form is for lifting the 40-minute limit on your Zoom account for K-12 educators. If you are not sure if someone has done that yet, go ahead and fill out the form. Either way, you will want to create your own account through Zoom.
Is there a time limit for families?
As long as you are the host of the meeting and your school/district has been verified (see above), there is no limit. However, if families create their own basic accounts and invite you to the meeting (i.e., the family is the host), there will be a 40-minute limit.
If I didn't write down my personal meeting link, is there a way to find it?
Yes, you can locate your personal meeting link on your “Profile” page. When logged in at Zoom.us, you will see “Profile” listed in the menu on the left. If you are using the desktop version, click on the icon in the top right corner of your screen (usually has your initials). Once there, click “My Profile.”
How do you respond to in-meeting chats?
On the bottom of your toolbar, there is a button called “Chat.” Type your message there, and click "enter" to send. Learn more about in-meeting chat from Zoom.
How do you create breakout rooms?
Breakout rooms are not included with a basic account, only with Pro accounts. If you have a Pro account, you will see the breakout rooms feature at the bottom on your toolbar. After clicking on the button, you can select how many people you want to be in each breakout room. Learn more about breakout rooms from Zoom.
Can you reuse the newly generated meeting for specific groups of students? And then use a different link for other regular groups that meet?
Yes. You can create a ‘recurring’ meeting for a specific group of students using a newly generated link, and it would be the same meeting link for them every time the meeting occurs. When creating a recurring meeting, you can choose the specific times that group will meet (e.g., it doesn’t have to be the same day or time for each meeting).
How can you view attentiveness during a meeting?
Zoom allows you to download attentiveness data in the “Reports” part of the platform after your meeting is over.
Can I mute and unmute meeting participants?
Yes. As host, you can click “Manage Participants” and "mute all" when you are speaking to guard against background noise. You can also "unmute all" participants if you are beginning a group discussion, or you can ask people to unmute themselves if they would like to chime in.
Can there be two meeting hosts? For example, if a classroom teacher and a librarian are hosting a meeting together.
Yes. The host can designate anyone to be a co-host during the meeting, which gives them the same privileges of the host.
Is there any way to see the students' faces during the meeting?
Yes, in a meeting you can enable all participants to turn their video on. Please note that students will need a webcam for this to work.
Will students be able to mute me? Can I disable that function?
Participants do not have the ability to mute the host. They could turn off their sound and not be able to hear you, but will never be able to prevent you from sharing your audio. You, however, as the host, have the ability to mute and unmute participants. Learn more about managing participants from Zoom.
Additional Zoom Resources
For more information, please explore the following resources and articles directly from Zoom: